Showing posts with label and. Show all posts

Wednesday, March 5, 2014

weapons and woodworking


While researching Japanese woodworking techniques I stumbled upon a Japanese artist by the name of Kintaro Yazawa. He was born in Tokyo and trained by a French woodworker who specializes in baroque organs. He moved to England and studied there during the British arts and crafts movement. A tool that he used intrigued me called Yariganna.
With more research I found that Yariganna is a Japanese spear plain named after the spear called yari used by soldiers in historical battles. The plane has a long, narrow, leaf-shape blade attached to the end of a handle, rather like a large chisel due to the unorthodox shape the quality of the timber finish depends entirely on the skill of the craftsman. It is used in shrines and temples.
Jared A
Read More..

Woodworking cartoons and zombies

Want to make a really simple garden bench? Check out this one Shannon Bickel from Timberlake Ohio made a few years ago, based on plans in Family Handyman Magazine. Make it in 15 minutes!


*****
Dezri Dean recently met a woodworker cartoonist at a garage sale. Check out Liggys cartoons over at Woodlaughs.com


*****
In my last video, I mentioned the possibility of making a zombie-themed whirligig. Well wouldnt you know it, of course theres one on YouTube! Check this out:


*****
Finally, a little bit more on my wood-chopper whirligig. It seems I put the blades on backward. Oops! But it still works. Finally had some wind the other day so you can see it in action.


Read More..

Zero1 attendence and participation

I was only able to attend the morning of the second day of the symposium so I was only able to hear about the climate clock and the plans of each group in attendance. I got the most out of the Amorphic Robots Works idea and plans for creating a climate clock called the Organograph. They had a unique idea and while they seemed to drift around in their explanation they had charts and diagrams to help them along or at least keep the audiences attention. I did wonder as to how their Organograph would function over 100 years as it seems it would have limited space to plant a garden over that time or even keep a garden going for that long unless it reuses space and alos produces the necessary materials to keep up a garden. One idea that did come up was the use of mechanical data collection and storage. I thought something along the lines of Babbages Analytical engine would have been brought up or discussed in this groups ideas of data collection and use.

Green Me idea of having a resident artist every year for 100 years was interesting as well although exact implementation of this was something I missed. Their plan does seem the easiest to get started although the works produced over the years would have to have someplace to be stored/displayed properly unless all the artists were restricted to a specific space. Each artist having to fit their idea into a predetermined form would make each creation uniform and unique at the same time.

Two things that stood out to me that appliy to each group: I really didnt hear much about the use of recycled materials or if people would actually do more than just view the works that will be produced. I thought some form of community interaction with the climate clock program would be interesting.

In the evening I was a part of a group of fellow students who set up a booth for the street festivities. We displayed and talked about a project we worked on in our 106 class last semester for the Red Cross Wearable art contest. The designs we created were design finalists and we got to attend the Red Cross heros Gala for 2010. The two outfits were a red cross backpack and a solar panel skirt with camera vest and LCD display bag. I really enjoyed talking to people about the outfits and the ideas behind them. A lot of people stopped to talk and ask questions over the course of the evening. I also attended the Greenprix the next had helped some of my professors with their green vehicle the Slo-Dog. It was a vehicle that used people peddling to power its tow vehicle and a hot dog cooker. There were a lot of cool vehicles there and unfortunately I did not get a chance to walk around much to learn more about the other vehicles.
Read More..

Saturday, February 22, 2014

Beautiful Garden and Patio Design Ideas for Better Summer

24 Beautiful Garden and Patio Design Ideas for Better Summer ...
24 Beautiful Garden and Patio Design Ideas for Better Summer Experience - 17
24 Beautiful Garden and Patio Design Ideas for Better Summer ...
24 Beautiful Garden and Patio Design Ideas for Better Summer Experience - 5
24 Beautiful Garden and Patio Design Ideas for Better Summer ...
Read More..

Oatmeal Bowl is finished and its colder than a well diggers you know what here

Hi Everyone,

Well, the apprentice and I did not get to finish the bowl together. He has been ill and recovering from some surgery earlier this year and just recently got out of the hospital. He had been having some minor nose bleeds the past week and yesterday had a good sized nose bleed and had to visit the ER for treatment. I didnt want to take him into a cold, dusty environment and hes on his way home today so we couldnt finish the turn. But I did go down and finish the turn and hell be able to see online how this went.

Heres the photos:


This is the bowl back on this lathe today and fortunately it hasnt distored. If you look closely you can see the extensive end grain tearing  and the whole thing needed to be hollowed out a lot more and that is what I did. I thinned the walls and then I sharpened by bowl gouge and turned the speed up to 900 rpm and very gently shaved the sides until they were smooth. Then I deepened and rounded out the bottom of the bowl:

This is the bowl after its been shaved. It needed very little sanding. Ive also refined the rim a little and removed some tearing along the rims edge:


And here is the finished bowl. Its got lots of mineral staining and some spalting lines. The color is a buff color and so when Ive applied the salad bowl varnish to it, its going to be really pretty:


This is the bowl from the side:

Now, since this was unseasoned, it has to go in the drying bag for 2 weeks to dry out and stabilize. Well come back to it then and take a look. If the wood fairies are kind to us, it will still be round and un-cracked and ready for varnishing.

So stay tuned for this one at the end of the month.

My next project is a bowl for my friend and colleague, John S.

See you later in the week.

VW

Read More..

Friday, February 21, 2014

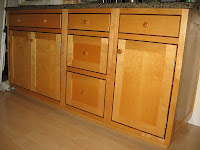
Maple and Walnut Kitchen

Custom Maple and Walnut Kitchen Cabinets, Westchester, NY 

Shaker style wall and base cabinets with a little flair -
Walnut contrasting band in all door and drawer openings give this timeless style a modern look. Four piece crown molding finishes the upper cabinetry to the ceiling, also highlighted by a walnut band.

Custom Maple and Walnut Kitchen Cabinets, Westchester, NY


Read More..

Poplar Bowl and Art Project Update

Hi Everyone,
I decided to go down to the shop for a couple of hours this morning to continue work on the poplar bowl and begin completing one of the art show pieces. Off to work we go:

Poplar bowl

Youll remember from last time that the surface of the bowl needed more work. Looking at it after the first coat of varnish dried showed that the surface was scratched from sanding and the end grain areas had a lot of pitting and crushed grain fibers. This needed to be corrected before proceeding with the rest of the varnish application so I took it down to the shop and put it back on the lathe.

I began sanding the inside with 120 grit sandpaper and 900 rpm. While the bowl is spinning I drag the sandpaper across the surface of the walls of the bowl very slowly and from the inside of the bowl to the edge of the bowl wall. I dont press hard on the sandpaper either, instead I just let the weight of my hand press down on the paper. The point here is to very gently shave the surface of the wood to remove any crushed grain and reduce the pitting on the surface. I went from 120 - 600 grit paper and this produced a smooth, shiny surface that was ready for another application of varnish:


Here is the bowl after its been sanded:


And here is the bowl after a coat of varnish. Its hard to see but the surface looks much better:


And while I was doing this I gave the coffee wood bowl another coat of salad bowl varnish too:


Both bowls will require another 1-2 coats of varnish before theyre done so stay tuned for more photos. The poplar bowl will be re-mounted on the lathe after Im done varnishing it so I can clean up the underside of the foot. So it has a little more time in the shop before its done.

Apple wood box

After looking at the apple wood box, I decided not to turn it any more but to instead sand it and get it ready for finishing and thats what I did. Here is a photo of the lid on the lathe:


 The lid needed finish sanding and the finial needed a little more turning so as not to look stubby. I also wanted to shave the surface of the finial more so I wouldnt have to do so much sanding. I took my skew chisel, sharpened it really well and very gently cut the surface of the finial until it was smooth and a little narrower. I also sanded it with 400 grit sandpaper and got it very smooth:


The box portion presents a different challenge as the surface is comprised of both solid wood and tree bark. I didnt want to accidently knock off any of the bark so I placed the box on the lathe and locked the lathe in place and hand sanded it. I used 120-400 grit paper on this and I got it really smooth without damaging it: 

Its now ready for a finish to be applied. For this Im going to use a spray lacquer so as to get the finish applied evening to the surface and into all of the nooks and crannies on the bark areas:


Heres the lid after one coat of lacquer:


And here is the box. Ill continue to use spray lacquer for several coats and then Ill take it off the lathe and gently polish the surface by hand:

While the above pieces are making their way through the finishing process, Ill continue working on the art pieces. The next project will be working on the black ash tea box. More about that tomorrow.

VW

Read More..

Monday, February 10, 2014

Ikea Rast Dresser Hack Fabric Wrapped with Custom Ring Pulls and Acrylic Casters

Over the weekend we finally finished our fabric wrapped Ikea Rast dresser!

These dressers are such an amazing price, only $35! The wood and building materials to make this yourself would be more, so buying is definitely worth it! While Rast hacks are nothing new, I couldnt help putting my own spin on it! Here are a few of my favorite fabric wrapped pieces, Centsational Girl, Hello Boudreau, and Recently.

I basically followed Martha Stewarts instructions to cover a table top with linen, heres how we did it!


First I used heavy starch to make the fabric stiff; however, it didnt work very well with this fabric, mine got much stiffer when I used a linen in my fabric wrapped parsons table. So a linen might work best for getting the fabric really stiff, though this worked fine too once it was ironed on to the wood. 
 
I placed the Rast dresser pieces on top of the fabric, a drapery panel from Target, and cut it out with enough to wrap around to the back. (Make sure to be mindful of the pattern direction, I had to redo one drawer front ...) I brushed water based polyurethane (satin finish) and then ironed. I also placed a piece of white paper on top to protect the iron from the poly (use your craft iron, you will probably still get some on your iron ... like me :)

We ended up wrapping the pieces individually, which meant the sides the top needed to be attached first with the fabric between the top and side since the screw holes are exposed and then insert the screws, and then apply poly and iron. It would be quicker to assemble the entire outside and then wrap that verse the individual pieces, so also consider doing it that way. I dont think that it would of looked very different, but would save time :)

I decided to line the inside of the drawers with extra white fabric and trim that I had, I think it gives a more polished finish!

To seal it, I applied a few layers of poly and then a layer of Briwax clear wax on the outside of the fabric to seal and protect it, like Martha Stewarts tutorial suggested. 

Before assembling the dresser, David drilled new holes to make the plate below the drawers flush instead of inset. We installed supports for casters out of extra 2x2s and followed the instructions to install the casters. We found brass and clear plastic casters from Ace Hardware, love them!! I then applied silver rub n buff to match the ring pulls.

I made my DIY ring pulls out of a cotter pin, inset washer, and 1" ring. The silver cotter pin was harder to open than the brass so I used pliers to open them instead of by hand. The cotter pin is inserted through the hole and then bent back on the inside of the drawer. (prior to applying the poly, I cut through the fabric at the existing hole with an xacto knife on both sides. I started on the back, where I could see the hole and the stuck the cotter pin through to find the other side, and then cut the front with the xacto knife) These ended up being only .96 each!! Such a good price!


How great are these clear casters? I really loved the brass with the clear, but silver works best with the fabric so I applied a little silver rub n buff.  

The flowers are from a friends wedding this past weekend, love hydrangeas! 


and I borrowed the acrylic tray from the driftwood herringbone table. 


Cost Breakdown:

Rast Dresser: $35 (Ikea) 
Fabric: $25 (Target)  
Ring Pulls: $6 (Parts from Ace Hardware) 
Casters: $9 (Ace Hardware) 

Total $75

Not the cheapest diy, but for unique fabric and custom hardware, Ill take it! 

Have you tried a Rast dresser hack or fabric wrapped furniture project yet? Im officially obsessed and cant wait to do more!! 
Read More..

Moxon Roubo and Schwarz


Benches and vices are all the rage today. Who would have thought that one man, Christopher Schwarz, could have such an impact on the sawdust producers of the world? It is astonishing, and more power to him. Sadly, it is quite possible that history might not give Chris the credit he deserves.

When historians, two hundred years from now, take a look back at the history of the cabinetmaker’s bench, they will see a proliferation of styles and unique designs dating back to the 17th century. They won’t find a standard design until they move forward 400-years or so, and then wham – no more individuality. What they will find by the time their research brings them to the early 21st century is that one man’s design becomes king. Cabinetmakers throughout the world, amateur and professional alike, suddenly started to build workbenches very similar to a design conceived by an 18th century, French cabinetmaker and book publisher, André-Jacob Roubo. It will be a shocking discovery.

Their research will also discover that just about every Roubo bench built in the 21st century will have a common accessory; a detachable, twin screw device known at that time as a “Moxon Bench Vice”. Again, they might miss Chris’ involvement in making this fixture such a popular shop accessory, and instead, give the credit to its original promoter, the 17thcentury book printer, mathematician and publisher, Joseph Moxon.

Returning to the present, we have to take a look at these two mechanical geniuses that we try to emulate.

The oldest is Joseph Moxon, the son of a printer who was born in 1627. This guy probably never picked up a chisel or plane in his entire life. He had three interests; printing, mathematics and religion. He is, however, credited with printing the first English language book on cabinetmaking, “Mechanic’s Exercises”, publish 6-years after his death in 1691. For this, the sawdust makers of the 21st century will forever hold him dear. Without Moxon, those that reverted back to the tools of yore would have had to start all over again, forced to use their own ingenuity to figure out the best way to use these difficult and confusing devices. Huzzah, huzzah, Joseph Moxon.

Following in Moxon’s footsteps was Roubo, an author who actually used the tools he wrote about. He was the third generation in his family to become a carpenter. Building was in his blood, it would appear, as he took his carpentry skills further by studying architecture and cabinetmaking. His most noted work today, however, is not the architectural splendors of France’s past, as all that he was involved with are long gone. Moxon’s claim to fame is a simple book he wrote called “The Carpenter’s Art”, which he had published in 1769.

Through Chris Schwarz and his own publishing company, Lost Art Press, Moxon and Roubo have been reborn. Here is a reality that I doubt even Chris realizes; Chris’ commercial endeavors with these two publications has resulted in more people having read these two works over the past five years than both Moxon and Roubo combined could ever dream of reaching in their lifetime.

Thankfully, original copies of these two works exist, but I have to ask the question, why the hell were they written in the first place?

In 17th century England, literacy was tied, no – welded, to wealth. During this century, it is estimated that London’s literacy rate was 70 to 80% while in the rest of the county, only 20% could read, and far less than that could write. This is easy to understand as London was England’s centre for the gentry; those with the means to send their children to school, and if they didn’t have the cash, the assets to borrow against to pay the tuition fees.

Given that Moxon wrote a book on a trade, you have to wonder who the hell would read it? Somehow I don’t think the gentry were interested in frame saws and the like, and they were the only ones who could read. It wasn’t like a kid from a poor family could go off to the library and pick out a book on his chosen career, because there wasn’t any. While invoices written by carpenters and cabinetmakers exist from that time, they are few and far between. The gentry chose their tradesmen by their ability to perform, both in their trade, as well as in their communication skills. It was a class society beyond class societies, and moneybags didn’t deal with commoners, so to win their business, a cabinetmaker had to fall within the gray area between gentry and commoner, a very small group indeed. The average village carpenter or cabinetmaker could neither read nor write, and didn’t miss it throughout their lifetimes.

France, in the 18th century, wasn’t much better than England in the 17th. Their class society was slower to decipitate, so illiteracy, while no more or less than it was in England, stayed constant for longer and was more difficult to overcome. This meant that Roubo had the same problem finding an audience for his book in France that Moxon faced in England. Great books, but who the hell could read them, let alone wanted to?

So here we are, three to four hundred years later, religiously following two geniuses that wrote books for audiences that probably didnt exist at the time. Go figure.

…and no, this isn’t a trashing of Moxon, Roubo or Schwarz. It is just an observation of mine developed from my own followings of Christopher Schwarz and my own interest in the history of England. I, like the vast majority of you, am in the midst of creating…


This is my interpretation of a Moxon Bench Vice. I made it from two honking slabs of hard maple, each 1¾” thick and two walnut screws. I got a great deal on these two screws from Evans Toolworks on eBay. Matthew was a lot of help to me, accommodating as all hell and a real pro to work with. We have a little something in the works right now that you might find interesting which I’ll post about when it gets done and, of course, if it actually works. I do know that he will be the supplier of the multiple screws I will need for the short-leg and tail vices I plan to build in the near future.

I built this to use while building my new bench/tool cabinet, so it is sized to accommodate panels up to 28” wide. As I think having a steel clamp-head sticking up higher than the top level of the vice is crazy, I cutout the tops of the rear panel’s ends so the clamps can be brought down lower. I have the handles to deal with, along with a couple of braces for the stabilizer that is attached to the bottom of the rear panel, another hunk of maple, this one 1” x 5”. I plan to use these braces to not only strengthen that right-angled joint, but to enlarge the surface area for the heads of the clamps that hold it to the bench. I’ll do a proper post about it all when I get it finished.

Peace,

Mitchell


Read More..

The Wild and Wonderful of Tool Collecting


So I have been busy spending my kid’s inheritance, but he shouldn’t mind as I’m having a blast doing it.

So taking you around the image above, the three Plane Floats at the front left have taken about six or seven months to get them to this point. The old one was purchased from The Best Things just before Christmas. I had it shipped to Jim Bode of jimbodetools.com, who made two copies of its handle for me. These were used to complete the two other floats, which were purchased without handles some time ago. Those two were hand-made by St. James Bay Tool Co. out of Arizona.

Behind those floats are four Stanley squares. The little wooden one is a 4 ½” No. 20, a Sweetheart era one with a full Stanley Tool sticker on the handle. The larger one is a pre-Sweetheart 6” No. 2. In front and behind the No. 2 are two 4” No.14’s, two purchases that include a saga that came to an end this morning.

I will try to make the story of these two squares as short as possible. I purchased the first one just before Christmas from jimbodetools.com. When it arrived, I checked it out and set it on my cabinet and forgot about it. Christmas day, my wife decided to clean up my office and asked me to put away some tools when she was done. Complying, I picked up the little square and it fell apart; the little, what Jim Bode says is the proper name for this thing, “screwpinwiththeelipticalgroove” having fallen out and disappeared. Needless to say I was a little p.o’d, not only for my wifes decision to clean on Christmas day, but also for messing with my stuff with the resulting loss of a irreplaceable part.

Two weeks into the New Year I found another No. 14 on eBay, being sold with the little No. 20 by shopdweller, who turned out to be a hell of a nice guy. Again my wife intervened to mess me up, asking me to take her shopping the day the listing ended, so of course I missed it. As the bidding for these two squares didn’t hit shopdweller’s reserve, I emailed him, asked him what he would take for them, we struck a deal, I purchased them and had him ship them to Jim Bode. Jim turned a new screwpinwiththeelipticalgroove for me and sent the whole lot on to me.

This morning, as I was sorting and putting the things that had again accumulated on my tool cabinet away, I saw a shiny thing flash as it went tripping off to the floor. Not knowing what it was, I started to look for it. First, I just got down on my hands and knees and searched, with no luck. I then grabbed the flashlight and searched with that, again with no luck. Finally, I grabbed a Pocket Magnet Retriever I had recently purchased from Lee Valley and started dragging it around all over the place. Well I came up with a shiny thing, I don’t know if it was what fell or not, but I was not happy when I saw what it was. Yup, you guessed it, it was that damned missing screwpinwiththeelipticalgroove that I had just spent a lot of money and jumped through hoops to replace.

Just as an aside to this story, the reason I own a Pocket Magnet Retriever is that two weeks ago my wife dropped a copy of the key to the car’s locking gas cap down between the seats and neither of us could see it. I told her not to worry about it as the cap came with two keys. I decided one would go in the little overhead storage place mounted to the car’s headliner and the other I gave her with the instructions, “Put this somewhere safe where you will remember where it is when we need it”. I would expect you figured this one out as well as, yes, she didn’t remember where she put it. My first attempt to retrieve the key in the known location was to buy this magnet thing and try fishing for something I couldn’t see with it. As that didn’t work, I had to remove the entire seat assembly and the carpet below it to find it, a job which was successful in its purpose the day before the gas gauge hit the almost empty mark again.

Now dont go thinking Im trashing my wife here, relating all these little trials and tribulations within these pages. God bless her, as without her, Id be lucky to own a screwdriver, let alone all the wonderful tools she has helped me accumulate over the years. Just between you and I, though, she is a bit of a forgetful klutz.

Ok, back to my tools.

Having just purchased and watched Chris Schwarz’s DVD, “Handplane Basics – A Better Way to Use Handplanes”, I was impressed by the amount of wood he removed from a plank using a Stanley No. 5 with a curved blade. As I also realized that this set-up and use would result in this plane taking a serious pounding, I went off to find one that was good, but cheap because I figure I will end up beating the hell out of it. I found the one you see in the back of the photo on Antiques of a Mechanical Nature. While the base of it is what they claimed, a Type 12 from 1910, I think it has a few Type 11 parts on it and as is the way with such things, no one will ever tell if one of the users put this assembly together, or it came from the factory this way. This was my first purchase from Larry and Carol Meeker and I found them to be very professional and straightforward.

In front of the No. 5 is a No. 49, the smaller of the tongue and groove pair. This plane was purchased from Patrick Leach of Superior Works – Patrick’s Blood and Gore fame. I found it on one of his more recent monthly lists. It is in very good shape and finding a No. 48 in the same condition to go with it is turning into a chore.

The handle sticking out in front of the No. 49 is actually an old awl that I grabbed from jimbodetools.com. There was absolutely no reason to buy this one as I already own a few, but as it turns out, I seem to have a thing for old, long, wooden-handled awls, and this one is a beaut.

To the right of the awl is the No. 3 that you have seen in the previous posts, as it is the one that I turned into an iPhone dock. I have used this plane a lot now, sadly, though, not for its original purpose, but as the dock.

Last week I received the Stanley No. 2 on the far right. Now I fell in love with that No. 3 the minute I had it out of the box and assembled, but I went absolutely nuts about this No. 2. What a spectacular little plane; a Type 8, it is in even better shape than the Type 9 No. 3. It took Jim of jimbodetools.com a couple of months and about five tool shows to find this one for me, and the man certainly has an eye for quality and value. I won’t tell you what I paid for both the No. 3 and No. 2, but I will say I have seen far worse examples sell on eBay for a lot more recently.

And mentioning eBay, I have to ask, what’s with all the junk on that site lately? I don’t know if my eye is getting better, or the tools are getting worse, but I haven’t seen much on that site worth buying for some time now.

Peace,

Mitchell

Read More..

visualization model making and digital fabrication classes 2 3

saturday was the last class for my green mountain college students above. i thank trevor for helping me to pull this off. i had no idea teaching a one credit course in something that we do all the time would be the challenge that it turned out to be. of course, i didnt anticipate on the fact that both trevor and i would have to learn at least the basics of importing files from the 3d program google sketchup to our toolpathing program, or that since these werent our ideas, in our language, we would have to get into thinking about their projects from their points of view ... anyway, we made it through and got all but one japanese puzzle box project pretty much finished. i think we all learned something ... i for one, learned that 15 kids in a class with five different projects is fun, but a lot of work ... i had to have a nap when they all left ..click the photos to enlarge them ...
chessboard concept, above and below
during the second class at gmc, we got to see and use lucass one sheet design tables that we cut on the cnc for him back in january ... (scroll way down) .. they worked great, both as singles and arranged in a block to form larger work areas ... very clever design .. the photos above are from the second class on march 24th at the on campus design studio. in that class, the groups finalized their project choices and they all worked up a rough cardboard mockup that explored their paper based ideas. that was funand while we were there, we got to see another design class project ... i forget the technical name, but it is on the line of the micro houses you may have seen in the news .. very cool ...
i wish i had had more time to take photos as the models progressed, but i didnt ... the group above learned that they had to do a little more research on angles and dimensions for comfortable seating ...
and the boys above had to do a little more research into lighting ...
there were adjustments on the fly that trevor handled with ease ...
the puzzle box required some fussy assembly and we came up a little short on getting that one working ... well make some revised pieces and send them up so it can be finished ...
im pretty sure a good time was had by all ...
Read More..

Wednesday, February 5, 2014

Your Boy Is Safe When He Is Working With Tools And Wood


Okay, this was going to be my first book “review”, but it has turned out to be more of a book ramble. The book is How to Work With Tools and Wood: For the Home Workshop, published in 1927 by the Stanley Rule & Level Plant.


I have no idea who actually wrote the book, and the signature of the foreword is no help at all…


I’m sure that one of the main reasons that Stanley published this book was to help sell tools. And yet there is more to it than that. There is a lot of discussion of aesthetic, craftsmanship and beauty in here too. I’d really like to know who wrote it.


This book is great for three reasons: 1. it smells good 2. it is tremendously campy and 3. it is full of great hand tool information.


First the smell:


What can I say, I love the way old books smell (NOT the moldy ones!). For me, it is a mix of my Grandmother’s attic; the old, old books I was always shelving in Drew University’s library; and summers in Vermont, reading an old book in the sun.


Now the camp:


Exhibit A:


Exhibit B:


I don’t think I need to say anything more.


Finally, the hand tool content:


It’s a great introduction to hand tool work that starts with a chapter titled “All of Us Can Use Tools” which addresses confidence and rational. I particularly like the hand tool philosophy stated here:


“The fact is that almost anything which we use can be made stronger, more simple, more beautiful, by loving hands than it can by machinery. There is no reason why a kitchen shelf may not be fundamentally beautiful. There is no reason why a door cannot be hung so that it swings at the touch of a hand and is beautiful because it is simple and rugged.


If you will learn to make an ordinary mortise, to form a dovetail joint, a halved joint, or to plane the edge of a board so that it is square; if you will learn to drive a nail straight, to put heavy screws in oak without splitting the board, and handles on a drawer so that they are straight: your work in wood should be beautiful.”


And:


“…You can go to a store and buy a candlestick complete and ready for use, varnished and polished, for from 10 cents to $5.00. You can make that candlestick yourself with perhaps no saving in money. But when you have made it and it is standing on the mantelpiece you have always before you as you look at it the memory of a sharp tool cutting into well seasoned wood. Through your hands, and your hands alone, the world is richer by the existence of that object that you can hold in your hand.


That is the satisfaction which the artisan in paint, the artisan in words, or the artisan in steel, stone, glass or wood feels. There is something priceless about it. You have a value that no man can take from you. Let the candlestick become blackened and charred, let it be broken by careless hands and still the joy of its creation cannot be taken from you, it is yours for the length of your life.”


Pretty deep stuff for old Stanley. It seems to me, that today, most “How To” books focus on the techniques (the actual “how to…”) and don’t involved themselves in the “Why” like this book tries to do – albeit a little strongly sometimes.


There is some very solid hand tool information. Topics covered include: a basic set of hand tools, tool chest (“…which is their respected domicile.”), bench, basic layout, hand sawing, cross-cutting vs. ripping etc., how to set and use a plane, truing up stock, boring with a brace and bit, mortising, how to bore and countersink screws, various work holding devices (including Stanley’s funky little Bench Bracket), the advantages of working from a detailed set of plans (available from Stanley…), finishing, sharpening, and several basic projects.


Throughout the book, illustrations are used to clarify or explain key points. Here is a classic:


One of the photographs from this book was also used by Stanley to advertise their project plans and chests of tools. Here it is, thanks to: http://www.hyperkitten.com/tools/


If you are interested in hand tool basics and/or enjoy reading old books, I highly recommend this book. It comes up frequently on eBay, doesnt go for too much, is full of good information, amusing photos and, at least for me, great philosophy.

Read More..